In the world of safety gear, outdoor equipment, and industrial applications, a well‑made webbing harness is more than just straps and buckles—it’s a lifeline. Whether you’re outfitting climbers, designing pet harnesses, or crafting tactical gear, understanding how to transform simple webbing into a reliable, load‑bearing harness is crucial. At Szoneier, with over 18 years of expertise in webbing R&D and manufacturing, we’ve perfected every stage of harness production, and we’re here to share that knowledge.
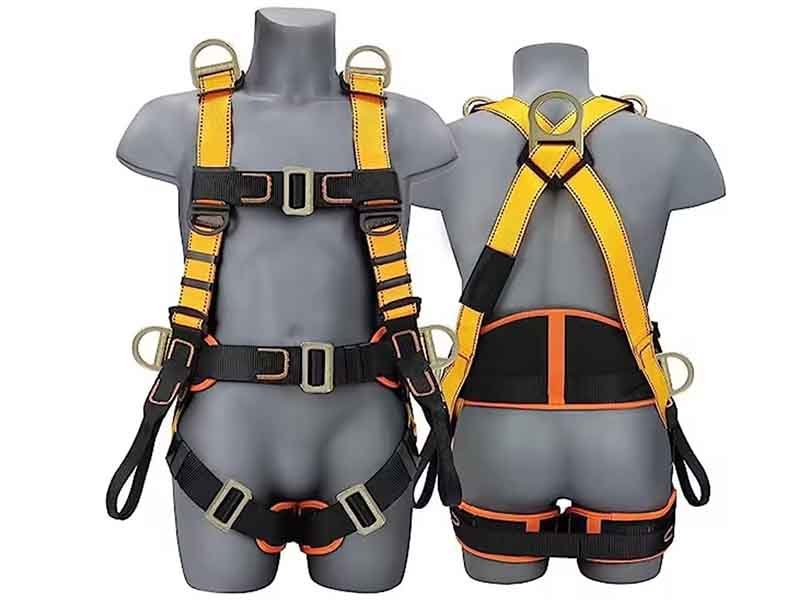
A webbing harness consists of interconnected straps, hardware, and stitching, designed to distribute weight safely and comfortably.
A webbing harness is made by selecting the right high‑strength webbing, cutting precise lengths, positioning buckles and D‑rings for load distribution, and stitching each junction with industrial‑grade thread at certified stitch patterns. Final inspections and load tests ensure safety compliance. This process—from material choice to certification—guarantees a harness that’s durable, adjustable, and fit for professional or recreational use.
Imagine a mountain rescue scenario: every strap, stitch, and buckle holds lives in the balance. One misaligned D‑ring or a poorly tensioned stitch could mean the difference between success and catastrophe. But beyond life‑or‑death operations, webbing harnesses serve in pet walking, construction safety, snowboarding, and even fashion. Ready to dive into the nuts and bolts? Let’s get started.
What Is a Webbing Harness and What Are Its Common Uses?
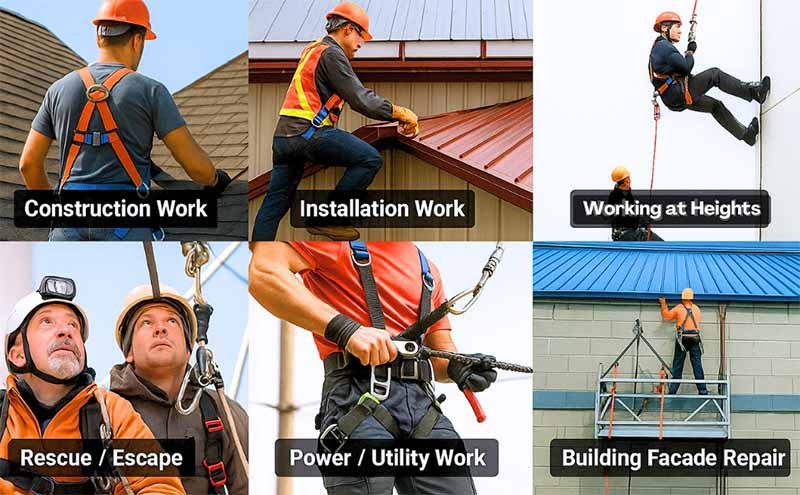
A webbing harness is a network of woven polyester or nylon straps, joined by hardware and reinforced stitching, designed to distribute force across the body or object. Common uses include climbing and rescue gear, fall protection in construction, pet leashes and harnesses, tactical vests, and load‑securing straps for transport. Each application demands specific design criteria—load capacity, adjustability, comfort, and regulatory compliance—to ensure safety and functionality.
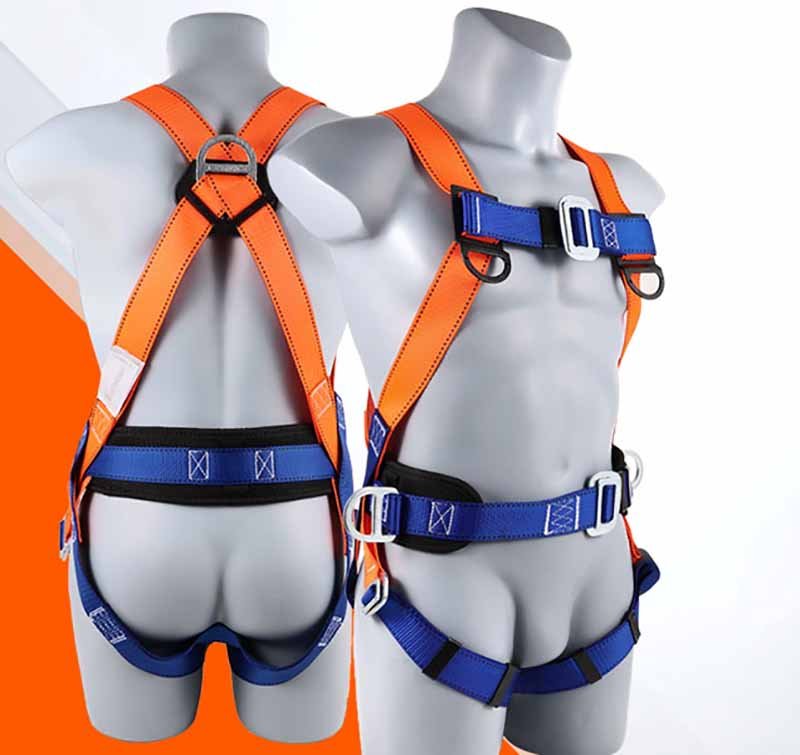
A webbing harness can range from a simple “H”‑type dog harness to a full‑body climbing harness with multiple points of adjustment. At its core:
Structural Components:
Webbing Straps: Typically woven from nylon or polyester, selected for their tensile strength (500–5,000 N) and abrasion resistance.
Hardware: Buckles, D‑rings, tri‑glides, and O‑rings, made from steel, aluminum, or high‑strength plastic, each chosen for load rating and corrosion resistance.
Stitching & Thread: UV‑resistant, bonded polyester threads (e.g., Tex 70–150) using certified stitch patterns (X‑box, zigzag) to meet ISO or CE safety standards.
Load Distribution & Comfort:
Load Paths: In climbing, the tie‑in point and belay loop must align to center of mass; in pet harnesses, chest and back straps distribute pull force to avoid choking.
Padding & Ergonomics: Padded waistbands, leg loops, or shoulder straps increase comfort during prolonged use. Mesh liners wick moisture and reduce chafing.
Industry Standards & Certifications:
Climbing & Rescue: UIAA 105, CE EN 12277 specify webbing and hardware load tests.
Fall Protection: OSHA and ANSI Z359 detail full‑body harness requirements, including dorsal D‑ring placement and batch traceability.
Pet Products: ASTM F2413 for animal‑wear harnesses focuses on bite strength, buckle retention, and adjustability ranges.
Versatility Across Applications:
Industrial Safety: Workers at height rely on webbing harnesses with shock‑absorbing lanyards and quick‑release buckles for rapid egress.
Sports & Recreation: From kayaking chest harnesses to zip‑line seats, webbing adapts to dynamic loads and environmental exposure.
Transportation: Cargo harnesses secure motorcycles, kayaks, or framing materials to trailers.
Fashion & Utility: Modern designs use webbing for backpacks, belts, and harness‑style apparel.
By recognizing the multitude of harness designs and their targeted use cases, manufacturers and end‑users can match features—such as webbing width, hardware material, and stitch density—to real‑world demands. In the next section, we’ll explore the materials that make these feats possible.
Which Types of Webbing Materials and Widths Work Best for Harnesses?
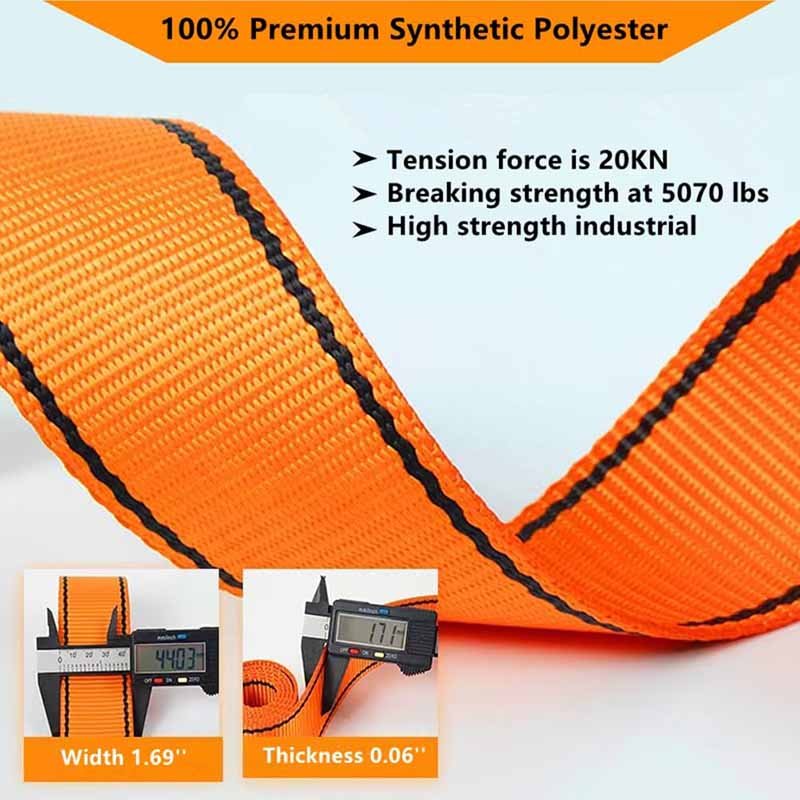
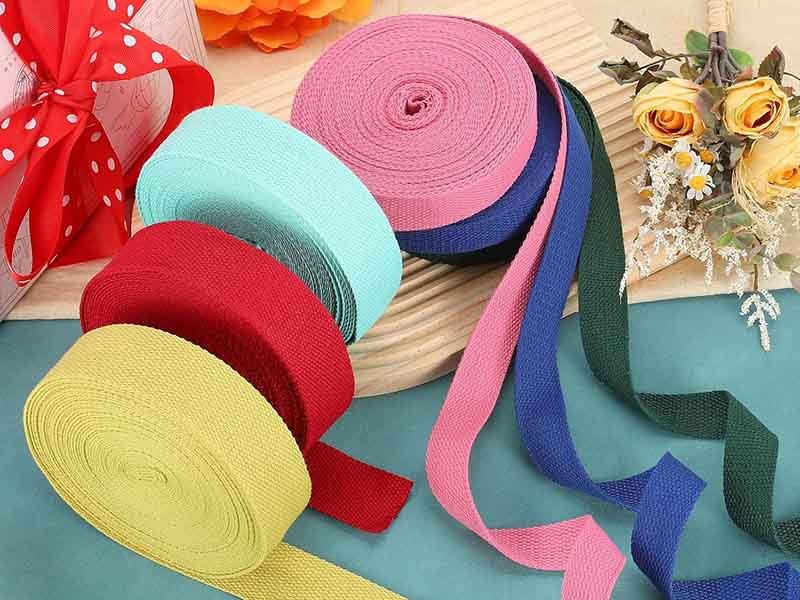
Harness performance hinges on webbing material—nylon offers flexibility and moisture resistance, polyester resists UV and abrasion, and polypropylene floats on water. Standard widths range from 10 mm for pet tags to 50 mm for heavy auto harnesses. Tensile strengths vary: 500 N at 10 mm up to 7,000 N at 50 mm. Choosing the right combination of fabric, denier, and width ensures your harness meets load-bearing, environmental, and comfort requirements.
Selecting the ideal webbing involves balancing mechanical properties, environmental exposure, and user comfort. Let’s break down the most common materials:
Material
Characteristics
Typical Widths (mm)
Tensile Strength* (N)
Ideal Applications
Nylon
High elasticity, excellent abrasion resistance, moderate UV tolerance
10 – 50
800 – 5,000
Climbing harnesses, rescue gear
Polyester
Low stretch, superior UV & chemical resistance, low moisture absorption
10 – 50
700 – 6,500
Fall protection, cargo straps
Polypropylene
Very lightweight, floats, chemical resistant, lower abrasion resistance
20–25 mm: Light pet harnesses, children’s safety vests.
30–35 mm: Adult pet harnesses, duty belts.
40–50 mm: Fall protection harnesses, heavy cargo straps.
At Szoneier, we custom‑weave all these webbing types in widths from 10 mm to 60 mm, offering bespoke deniers and UV/anti‑fungal coatings. In bulk orders, you can specify precise denier, dye lots, and edge finishes to match stringent industry specs.
How Do You Design the Harness Layout and Measure for Fit?
Designing a harness requires mapping strap paths over the body or object, placing load‑bearing points at shoulders, chest, waist, and legs. Use anthropometric data or CAD templates to generate patterns. Measure critical circumferences—chest, waist, thigh—and apply ease allowance (5–10 mm). Prototyping with adjustable mock‑ups ensures fit before bulk cutting. Document each dimension in a spec sheet for consistent OEM/ODM production.
An accurately designed harness layout balances safety, comfort, and user variability:
Mapping Load Paths:
Full‑Body Harnesses: Follow an “X” shape across shoulders, connect at dorsal and sternal D‑rings for fall arrest.
Chest Harnesses (Sports/Tactical): Straps cross at sternum, with side adjusters to stabilize loads (e.g., hydration packs).
Pet Harnesses: Y‑shaped chest strap disperses pull away from the neck; back strap carries leash attachment.
Anthropometric Data:
Reference ISO 8559 or ASTM F1537 for body measurement standards. Key dimensions include:
Chest Circumference: Measure at nipple line; add 5–10 mm for ease.
Waist/Underbust: For waist belts, measure at natural waist or just above hip bones.
Thigh Circumference: Essential for leg loops—measure 10 cm below groin.
Torso Length: From C7 vertebra to crotch for full‑body harness vertical placement.
Creating Patterns & Mock‑ups:
CAD Templates: Import measurements into software (AutoCAD, SolidWorks) to visualize strap angles and intersection points.
Physical Prototyping: Use low‑cost cotton webbing to build adjustable mock‑ups on fitting dummies or volunteers, refining lengths and buckle positions.
Adjustment Range:
Design each adjustable segment with at least 50 mm of travel to accommodate size variation and clothing layers (e.g., jackets).
Incorporate tri‑glide adjusters with 25–30 mm width, matching webbing for seamless sliding.
Spec Sheet Documentation:
Record every dimension—strap length, hardware placement, stitch pattern locations—in a formatted spec sheet.
Include material call‑outs (webbing type, denier, coating), hardware details (material, finish), and stitch thread type.
Ergonomic & Safety Considerations:
Minimize chafing by routing straps away from pressure points.
Ensure D‑rings sit within 20 mm of the body’s center of mass to reduce rotational torque during a fall.
By rigorously measuring and prototyping, you avoid wasted material and costly production errors. At Szoneier, our design team collaborates with you through multiple mock‑up iterations, guaranteeing a harness that fits your exact use case.
What Tools and Equipment Are Required to Fabricate a Webbing Harness?
Manufacturing a harness requires heavy‑duty cutting equipment (hot‑knife or rotary cutter), industrial sewing machines (bar tack, zigzag, and box‑X stitch heads), heat sealers for edge finishing, and load‑testing rigs. Essential tools include webbing tensioners, budget fixtures for alignment, and UV‑cure adhesives for extra joint security. Proper PPE—gloves, eye protection—and calibrated measurement tools (calipers, templates) ensure precision, safety, and repeatable quality in bulk OEM/ODM runs.
An efficient production line blends automation with skilled craftsmanship. Key equipment includes:
Cutting & Sealing:
Hot‑Knife Cutters: Electrically heated blades cut and seal webbing edges in one pass, preventing fray.
Rotary Fabric Cutters: For fast, straight cuts on wide webbing rolls; paired with edge tapes to guide alignment.
Laser Cutters (Optional): Precise, non‑contact cuts with sealed edges; ideal for complex shapes.
Multi‑Head Zigzag Machines: Create box‑X, zigzag, and multi‑stitch patterns across webbing widths up to 60 mm.
Button‑Hole/Loop Feeders: For attaching webbing loops around hardware with minimal manual handling.
Hardware Assembly:
Tensioning Fixtures: Hold webbing taut during buckle and D‑ring feeding to ensure consistent stitch placement.
Press‑Fit Machines: For plastic buckle insertion, applying uniform pressure to lock in buckles and adjusters.
Riveting Presses: For harnesses requiring metal rivets in addition to stitching.
Quality & Load Testing:
Tensile Testers: Calibrated machines to pull stitched samples until failure, verifying minimum breaking strength (MBS) per spec.
Webbing Abrasion Testers: Martindale or Taber testers simulate wear conditions to ensure long‑term durability.
UV Exposure Chambers: Accelerated weathering tests for outdoor harness validation.
Supporting Tools & Safety Gear:
Calibrated Calipers & Micrometers: Precise measurement of webbing thickness and width.
Angle Jigs & Templates: Standardized patterns for repeatable harness shapes.
PPE: Cut‑resistant gloves, safety glasses, and ear protection for noisy machinery.
At Szoneier, our advanced facility houses automated cutting tables, 30+ industrial sewing stations, and an in‑house lab for material and hardware testing. This vertical integration—from raw webbing extrusion to final inspection—ensures product consistency and rapid turnaround for large OEM/ODM orders.
How Do You Cut, Stitch, and Assemble the Webbing Components?
Begin by cutting webbing to spec with a hot‑knife at precise lengths. Next, feed straps through dedicated fixtures to pre‑tension. Use bar‑tack and box‑X stitch patterns—minimum 6 mm stitch density—at all hardware junctions. After sewing, trim and heat‑seal leftover edges. Finally, assemble buckles, D‑rings, and adjusters, verifying each segment against the spec sheet. A systematic workflow and quality checks at each step guarantee harness integrity and bulk production efficiency.
The assembly process transforms raw webbing and hardware into a finished harness:
Webbing Preparation:
Cutting: Load webbing rolls onto unwind stands. Use programmable hot‑knife tables to cut lengths ±1 mm accuracy, sealing edges instantly.
Labeling: Attach temporary tags with batch numbers and spec codes for traceability.
Pre‑Tensioning & Fixture Setup:
Fixtures: Rig tension frames with mandrels matching final harness shapes (e.g., leg loop contours). This ensures stitching occurs under proper tension to resist stretch during use.
Tension: Apply 5–10 N of webbing tension using calibrated springs or pneumatic actuators.
Stitching Sequences:
Load Points: Program bar‑tack machines for 20–30 mm wide reinforcements. Ensure minimum 4 passes of 6 mm reinforcement zigzag at D‑ring seats.
Box‑X Patterns: For strap intersections (e.g., waist belt to shoulder straps), stitch 25 mm × 25 mm box with diagonal cross (X) at 6 mm stitch density.
Edge Locking: Use overlock stitch heads for edge seams on padded sections or decorative bindings.
Hardware Integration:
Buckles & Adjusters: Slide male buckle halves onto strap ends before final stitch; male and female halves must align flush.
D‑Ring Attachment: Loop webbing through D‑ring, back‑tack securely. For split D‑rings, ensure orientation matches load path.
Post‑Sewing Cleanup:
Trimming: Remove stray threads and cut loose ends.
Heat Seal: Briefly pass trimmed ends under a heat bar (200 °C) to re‑melt and seal.
Inspection: Check stitch count, pattern accuracy, and tension consistency under magnification.
Batch Assembly & Packaging:
Group harnesses by size and color.
Bundle 10–50 pcs per carton with moisture‑barrier bags and spec sheets.
Label cartons with model, size, batch, and customer PO details.
This structured approach minimizes defects and streamlines high‑volume production. Szoneier’s technicians conduct in‑line inspections at each stage, keeping our defect rate below 0.3%.
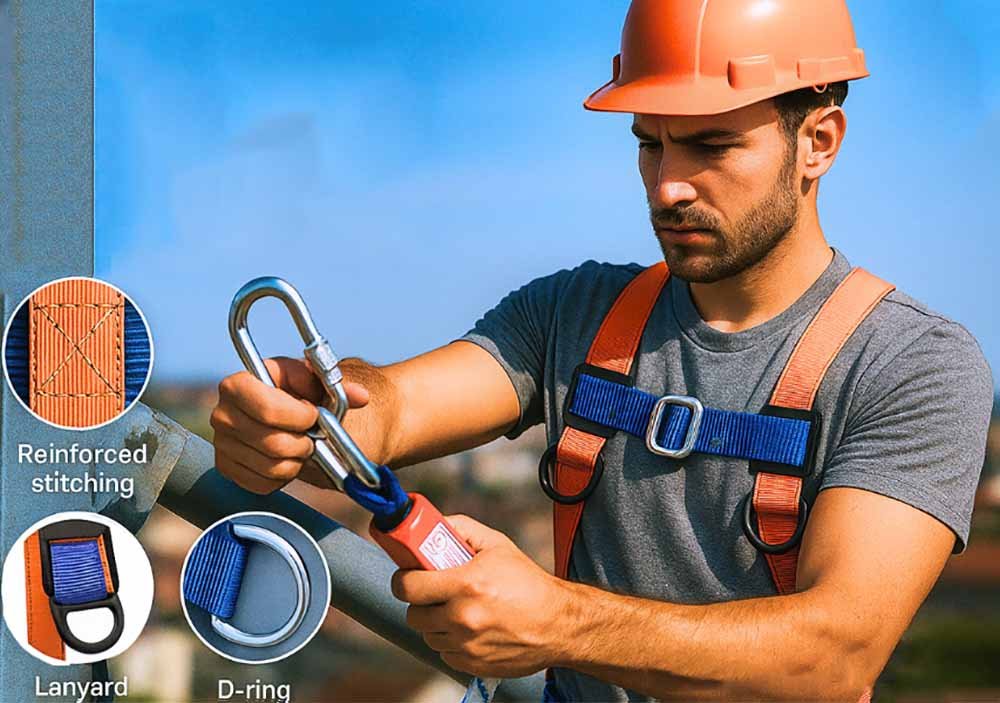
What Are the Best Practices for Securing Buckles, D‑rings, and Adjusters?
Secure hardware by looping webbing through buckles with a minimum 25 mm feed length, then back‑tack with at least four parallel zigzag stitches. Orient D‑rings to align load vectors, using split rings or welded units for added strength. Tri‑glide adjusters should be finish‑sealed and feature serrated bars for grip. Always conduct pull tests at 1.5× the working load limit to verify attachment integrity before bulk deployment.
Hardware reliability dictates harness safety. Follow these guidelines:
Buckle Attachment:
Feed Length: Ensure a minimum of 25 mm webbing passes through the buckle bar before stitching—this prevents slippage under load.
Stitch Pattern: Use a 4‑bar zigzag (6 mm density) or bar‑tack with 20–25 mm width on both sides of the bar.
Orientation: Align buckles so that load pulls against the strongest stitch direction.
D‑Ring Installation:
Ring Types: Split D‑rings (stainless steel) for easy assembly; welded D‑rings for higher rated applications.
Loop Design: Double‑back the strap: webbing → D‑ring → back through webbing, then bar‑tack. This “choke” configuration tightens under tension, minimizing ring movement.
Vector Alignment: Position rings so load vector is perpendicular to the stitch axis, reducing shear stress on stitches.
Finish Sealing: Apply UV‑cure resin after sewing to lock webbing in place on the adjuster.
Stitch Reinforcements: For heavy loads, supplement with a small bar‑tack under the adjuster’s lower bar.
Working Load & Safety Factors:
WLL & MBS: Hardware should have a minimum breaking strength (MBS) at least 5× the working load limit (WLL).
Pull Testing: Randomly sample 5–10% of harnesses per batch, pulling at 1.5× WLL for 60 s to observe any slip or deformation.
Corrosion & Wear Protection:
Material Choice: Opt for stainless steel 316 or anodized aluminum buckles in marine or high‑humidity environments.
Coatings: Use PVD or powder‑coat finishes to resist scratching and oxidation.
Adhering to these best practices ensures hardware remains the strongest link in your harness—critical for user safety and product reliability.
How Do You Test, Inspect, and Certify the Finished Harness for Safety?
Every harness batch undergoes multi‑stage quality assurance: visual inspections check stitch patterns and hardware alignment; dimensional gauges verify strap lengths and adjuster positions; tensile tests pull critical junctions to at least twice the working load limit; abrasion and UV‑weathering chambers simulate years of wear; and chemical and temperature cycling ensure material integrity. Finally, certified samples receive CE/UIAA or ANSI labels along with batch traceability tags, guaranteeing each harness meets or exceeds industry safety standards.
Ensuring a webbing harness is safe for real‑world use means subjecting it to rigorous testing protocols and inspection routines. Below are the key steps that transform a finished product into a certified safety device:
Visual and Dimensional Inspection:
Stitch Verification: Trained inspectors use magnification and template overlays to confirm that bar‑tack and box‑X stitches meet design specifications—correct count, density (minimum 6 stitches/cm), and pattern geometry.
Hardware Alignment: Buckles, D‑rings, and adjusters are checked for proper orientation relative to load paths. Any hardware misalignment can concentrate stress and precipitate failure.
Dimensional Gauges: Custom jigs verify strap and loop lengths within ±1 mm tolerance. Repeatability is crucial for batch consistency in OEM/ODM production.
Destructive Load Testing:
Tensile Strength: Samples of stitched junctions are clamped into hydraulic tensile testers and pulled at a standardized speed (e.g., 500 mm/min) until failure.
Safety Factor Compliance: Industry guidelines (e.g., EN 12277 for climbing, ANSI Z359 for fall arrest) require minimum breaking strengths of 2–5× the working load limit (WLL). Harness designs are validated against the highest applicable safety factor.
Cross‑Sectional Testing: Webbing alone is also tested to ensure raw material meets denier and weave density specifications.
Durability and Environmental Simulation:
Abrasion Resistance: Using a Martindale or Taber tester, stitched samples endure 10,000–20,000 abrasion cycles under controlled pressure. This replicates extended field use and confirms seam integrity.
UV and Weathering: Samples sit in UVB light chambers for 500–1,000 hours to simulate sun exposure. Post‑test assessments measure tensile retention (should remain ≥85% of original strength) and color fastness (ΔE < 5).
Chemical Exposure: Harness elements are soaked in saltwater, chlorine solutions, and mild acids to evaluate degradation. A tensile drop of no more than 10% confirms chemical resilience.
Thermal Cycling: Repeated cycles between −20 °C and 80 °C reveal potential brittleness or hardware loosening, ensuring performance in extreme climates.
Non‑Destructive Evaluation (NDE):
Ultrasonic Seam Scanning: High‑frequency probes detect stitch voids or inconsistencies without damaging the harness.
Dye Penetrant or Infrared Inspection: For metal hardware welds (in welded D‑rings), these techniques reveal cracks invisible to the naked eye.
Certification and Traceability:
Standards Compliance: Once tests pass, harnesses are labeled with CE (EN 358/EN 361), UIAA, or ANSI tags as appropriate. These certifications assure end‑users that the product meets stringent international criteria.
Batch Tagging: Each harness carries a QR‑coded label linking to a digital inspection report—detailing raw material lot numbers, test results, and inspector IDs. This end‑to‑end traceability supports recalls and quality audits.
Documented Reports: Comprehensive test certificates and material data sheets accompany OEM/ODM shipments, enabling brands to demonstrate compliance to regulators and clients.
Ongoing Quality Monitoring:
Statistical Process Control (SPC): Production data—tensile results, inspection findings, defect rates—feed into an SPC system that flags any deviation from control limits, prompting corrective actions.
Customer Feedback Loop: Real‑world performance data from field users inform continuous improvements to materials, stitch processes, and design features.
By integrating these testing and inspection stages into its workflow, Szoneier ensures that every webbing harness not only meets but often exceeds industry benchmarks. This rigorous QA framework provides peace of mind for distributors, professional users, and end‑consumers alike—guaranteeing that when lives depend on your harness, there are no surprises.
How Can Brands Customize and Private Label Harnesses for OEM/ODM Orders?
Brands can leverage Szoneier’s OEM/ODM services to customize webbing color, width, hardware finishes, logo placement, and packaging. With a low MOQ of 50 pieces, free digital mockups, and 7‑day rapid sampling, clients receive tailored harness designs that meet their brand identity and application requirements. Full turnkey solutions include private‑label packaging, user manuals, and compliance labeling—streamlining market launch for retailers and pro‑gear manufacturers.
Developing a private‑label harness with Szoneier involves a collaborative, end‑to‑end process:
Initial Consultation & Conceptualization:
Needs Assessment: Discuss target application (e.g., tactical, pet, industrial), user demographics, and load requirements.
3D Renderings: Provide photorealistic CAD visuals showing webbing layouts, hardware types, and stitch patterns.
Physical Samples: Rapid sampling (7–10 days) using actual production materials for hands‑on evaluation.
Material & Hardware Selection:
Custom Webbing Dye Lots: Match proprietary colors with ≤ΔE 2 accuracy.
Hardware Finishes: Choose from polished, matte, PVD, or custom electroplating.
Special Features: Add reflective tapes, glow‑in‑the‑dark threads, RFID straps, or embedded IDs.
Pilot Production & Testing:
Pre‑Production Run: 50–200 harnesses undergo full QA testing, ensuring all specs and certifications align.
User Trials: Field tests by client teams, gathering feedback on fit, comfort, and functionality.
Full‑Scale Manufacturing:
Low MOQ Flexibility: Scale from 200 to 100,000+ units with consistent quality controls.
Turnkey Solutions: Inclusive of private‑label packaging, instruction leaflets, and compliance documentation.
Ongoing Support & Reorders:
Traceability: Maintain batch records to expedite reorders with exact material and hardware matches.
Continuous Improvement: Iterate on design based on market feedback, leveraging Szoneier’s R&D for new coatings or webbing innovations.
This seamless OEM/ODM framework empowers emerging brands and established companies alike to bring unique, high‑performance harnesses to market quickly and confidently.
Conclusion
From selecting the optimal webbing material to mastering advanced stitching patterns, crafting a reliable webbing harness is a complex, precision‑driven process. By following this expert guide—and partnering with an experienced manufacturer like Szoneier—you ensure every harness meets rigorous safety standards, delivers user comfort, and reflects your brand’s identity.
Ready to launch your custom webbing harness line?
Contact Szoneier today for free design mockups, low MOQ, rapid sampling, and full OEM/ODM services:
If you have your own artwork, logo design files, or just an idea,please provide details about your project requirements, including preferred fabric, color, and customization options,we’re excited to assist you in bringing your bespoke bag designs to life through our sample production process.
Looking for premium custom webbing? Contact us now for competitive pricing, free samples, and expert consultation. Fill out the form below, and our team will get back to you within 24 hours!